
Setup Guide
Prerequisites
Section titled “Prerequisites”- An active Onetime Secret account with custom domain feature enabled
- A domain you own and can manage DNS settings for
Understanding Domain Types
Section titled “Understanding Domain Types”Before setting up your custom domain, it’s important to understand the difference between subdomains and apex domains:
- Subdomain: A subdivision of your main domain (e.g., secrets.yourdomain.com)
- Apex Domain: The root domain itself (e.g., yourdomain.com)
Choose Your Region
Section titled “Choose Your Region”Onetime Secret offers multiple data center regions: EU, UK, US, CA, and NZ. When setting up your custom domain, you’ll need to choose which region you prefer for storing your data. This choice is important for several reasons:
- For Individuals: You can choose based on your personal preference, such as proximity for potentially faster access or personal data sovereignty concerns.
- For Businesses: Your choice may depend on your data locality obligations, such as compliance with GDPR, state, or provincial guidelines. Ensure you select the region that best aligns with your regulatory requirements.
Consider your specific needs and requirements when making this choice. For more detailed information about our data center regions and how to choose the right one for your needs, please refer to our Where your data lives guide.
Step 1: Access Domains Dashboard
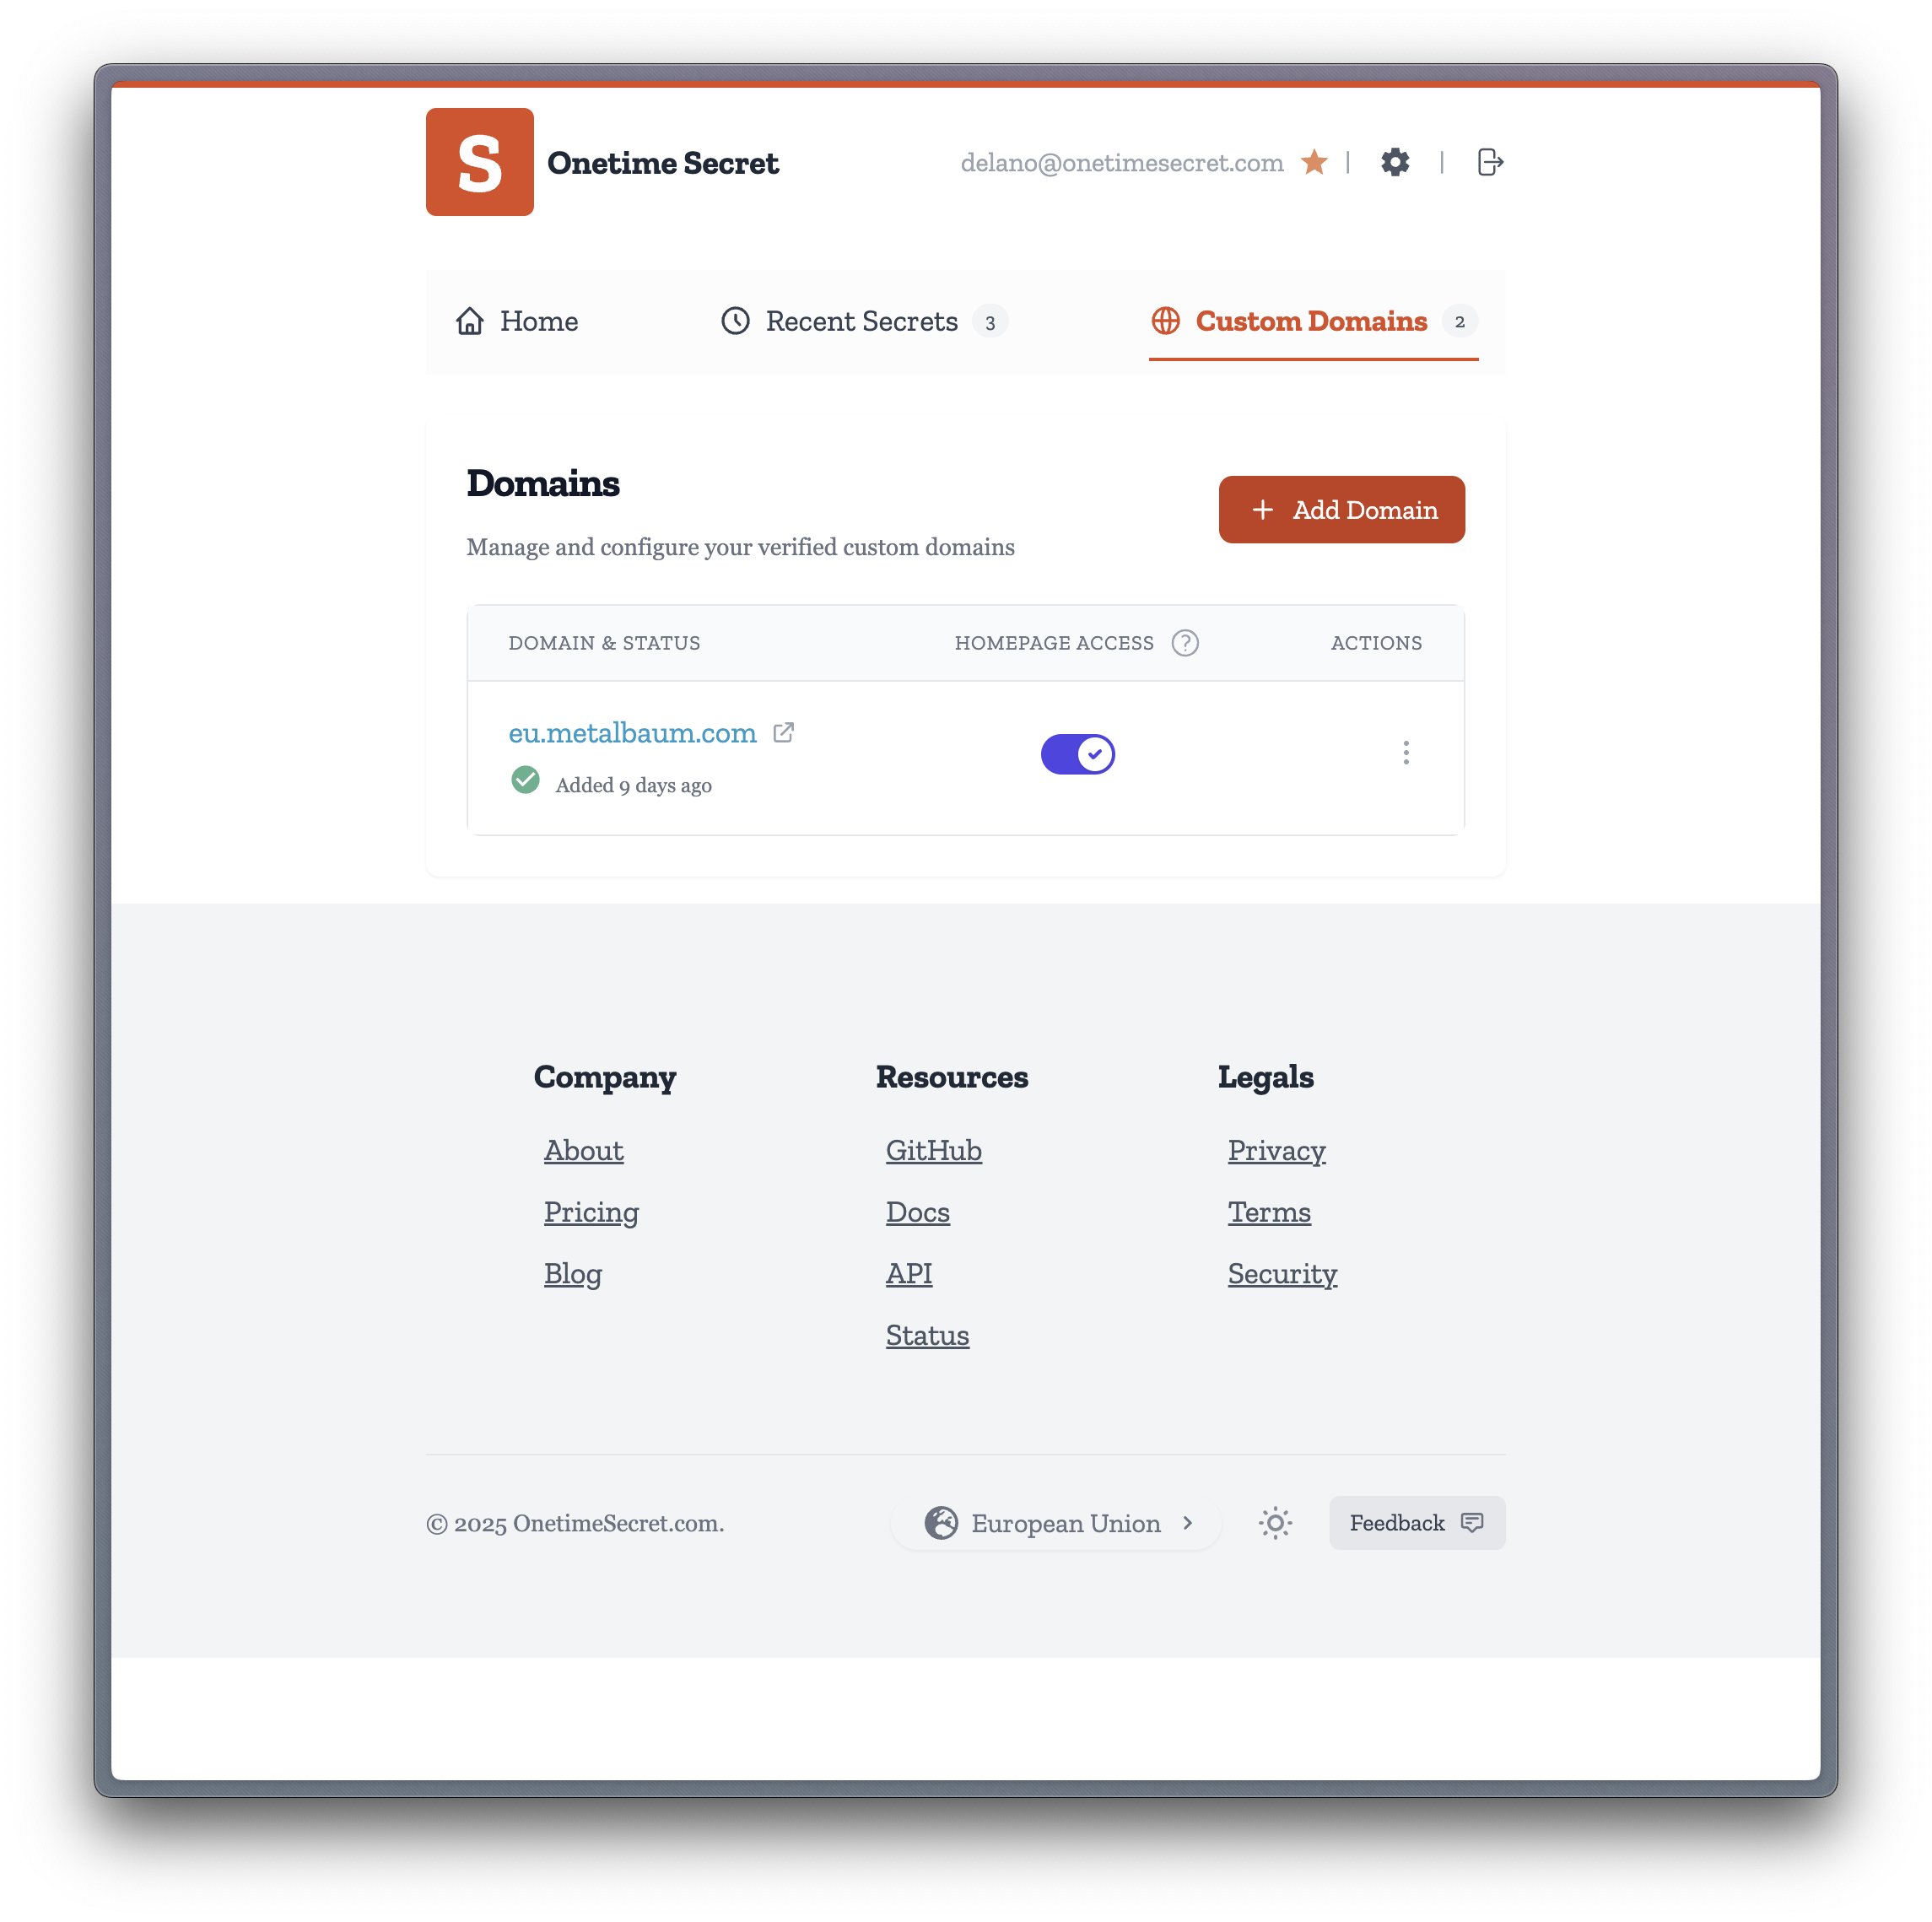
Section titled “Step 1: Access Domains Dashboard”- Log in to your Onetime Secret account
- Navigate to Dashboard > Custom Domains
- Click “Add Domain”
Step 2: Enter Your Domain
Section titled “Step 2: Enter Your Domain”- In the custom domain settings, enter your desired domain (e.g., secrets.yourdomain.com or yourdomain.com)
- Click “Add Domain” or equivalent button to proceed
Step 3: Configure DNS Settings
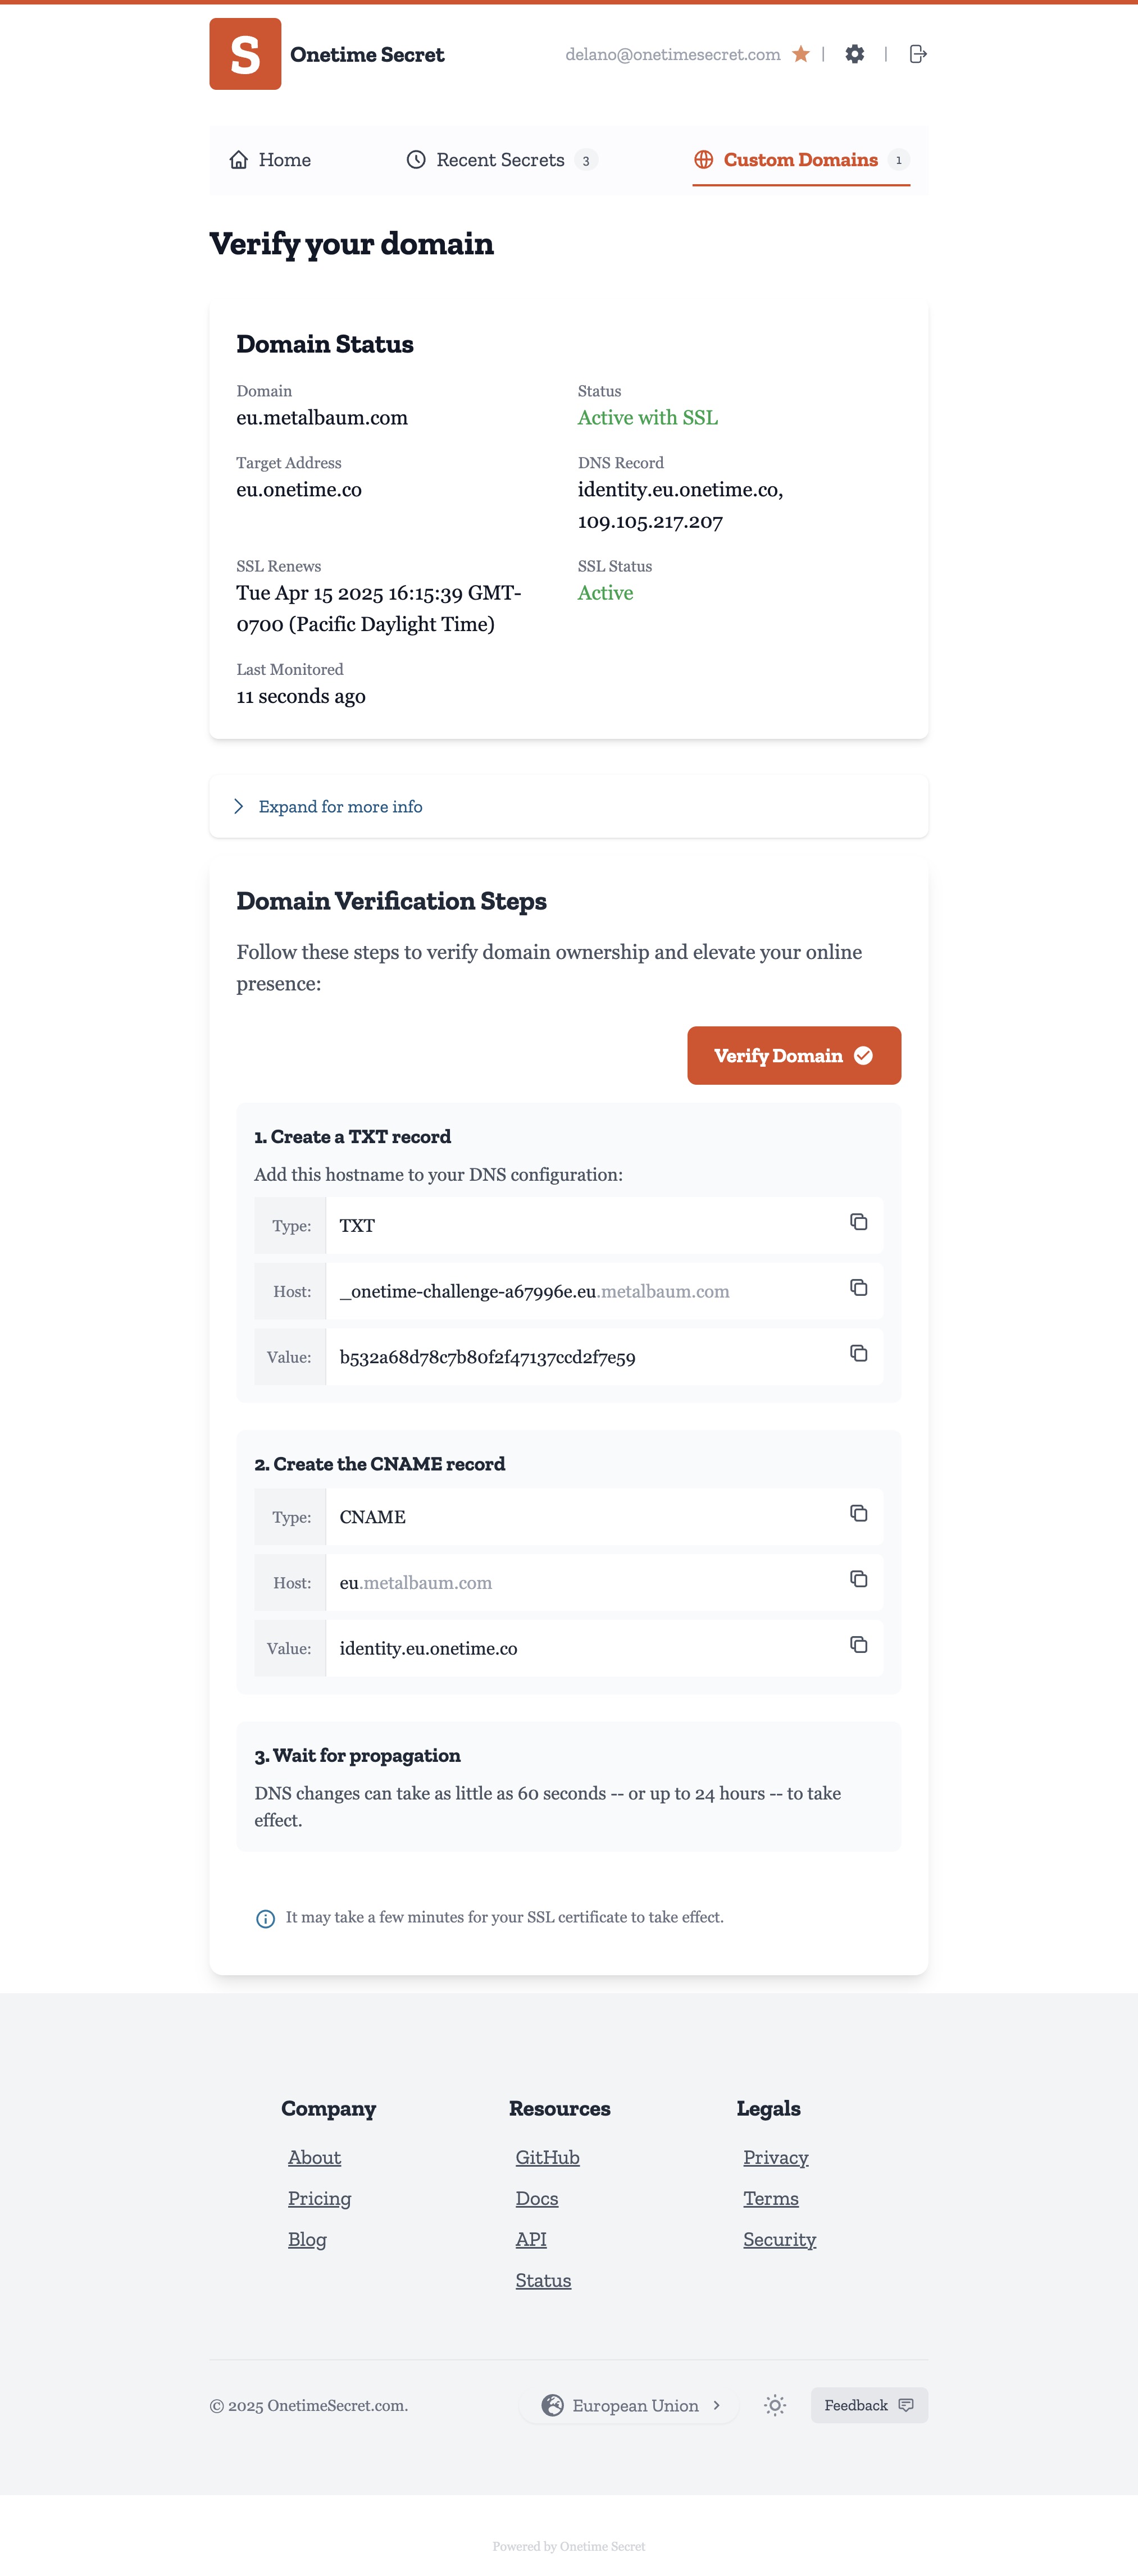
Section titled “Step 3: Configure DNS Settings”To connect your domain, you need to create exactly two DNS records: a TXT record that verifies you own the domain, and a routing record (CNAME for subdomains, A for apex domains). You can create them in either order. The routing record differs slightly depending on whether you’re using a subdomain or an apex domain, and which data center region you choose.
Create the Ownership Verification TXT Record (All Domains)
Section titled “Create the Ownership Verification TXT Record (All Domains)”Your Domain Dashboard lists this record first, before the routing record, and shows the exact Type, Host, and Value to copy.
- Access your domain’s DNS management panel (through your domain registrar or DNS provider)
- Create a TXT record, copying the Value exactly as shown in your Domain Dashboard and entering the Host in your registrar’s expected form:
- Host:
_onetime-challenge-<id>for an apex domain, or_onetime-challenge-<id>.<subdomain>for a subdomain, where<id>is a short identifier unique to your domain- For an apex domain (e.g., example.com):
_onetime-challenge-abc1234 - For a subdomain (e.g., secrets.example.com):
_onetime-challenge-abc1234.secrets— the record is created on the base domain’s zone (example.com)
- For an apex domain (e.g., example.com):
- Value: the unique 32-character hexadecimal code shown in your dashboard
- Host:
The host and value above show the shape only — your actual record is unique to your domain and must be copied from your Domain Dashboard. The value never rotates or expires.
Registrars display record hosts differently: some expect just the label (and append the zone for you), others expect the fully qualified name. Enter the host in whichever form your provider expects — what matters is that the resulting record resolves at <host>.<your base domain> and returns the dashboard value unchanged.
Ownership verification cannot complete without this record, and it must stay in place after verification — do not remove it.
For Subdomains (Recommended)
Section titled “For Subdomains (Recommended)”- Access your domain’s DNS management panel (through your domain registrar or DNS provider)
- Create a CNAME record with the following details:
- Host: Your chosen subdomain (e.g., secrets)
- Points to / Value:
- For CA region: identity.ca.onetime.co
- For EU region: identity.eu.onetime.co
- For NZ region: identity.nz.onetime.co
- For UK region: identity.ingress.onetime.co (anycast)
- For US region: identity.us.onetime.co
- Remove any existing A, AAAA, or CNAME records for the same subdomain — but keep the TXT ownership record
For Apex Domains
Section titled “For Apex Domains”- Access your domain’s DNS management panel
- Create or modify an A record with the following details:
- Host: @ (or leave blank, depending on your DNS provider)
- Points to / Value:
- For EU region: 109.105.217.207
- For US region: 66.51.126.41
- For other regions: Contact support for current A record IP addresses
Important: Ensure there are no conflicting A, AAAA, or CNAME records for the domain you’re using. The TXT ownership record is not a conflict — leave it in place.
More Info
Section titled “More Info”Why CNAME for Subdomains?
Section titled “Why CNAME for Subdomains?”We recommend using CNAME records for subdomains because:
- They’re more flexible and allow us to change our server IP addresses without requiring you to update your DNS settings.
- They automatically adapt to any changes we make to our infrastructure.
Why A Records for Apex Domains?
Section titled “Why A Records for Apex Domains?”Apex domains cannot use CNAME records due to DNS standards. Therefore, we must use A records, which have some limitations:
- If we change our IP address (which is rare), you’ll need to update your DNS settings manually.
- They don’t automatically adapt to changes in our infrastructure.
Step 4: Verify Domain and Wait for SSL
Section titled “Step 4: Verify Domain and Wait for SSL”- After creating both DNS records, return to the Onetime Secret custom domain page
- Press the “Verify” button to check your records right away — verification also re-runs automatically about every 30 minutes
- Every verification pass checks both records: the TXT ownership record and your CNAME or A record
- SSL certificate generation will begin once verification is successful
- This process may take a few minutes to complete
Note: a correct CNAME or A record alone will never verify. SSL may already be issued and your domain may appear to work, but ownership verification cannot complete until the TXT record is in place.
For a closer look at the verification lifecycle, what each domain status means, and how to resolve a failed check, see DNS Validation.
Step 5: Confirm Setup
Section titled “Step 5: Confirm Setup”Once setup is complete, you should see the following information:
- Domain Status: Active with SSL
- Target Address: The identity endpoint for your chosen region (e.g. identity.ca.onetime.co, identity.eu.onetime.co, identity.nz.onetime.co, identity.ingress.onetime.co, identity.us.onetime.co)
- SSL Status: Active
- SSL Renewal Date: (Will be displayed, typically about a year from setup)
Troubleshooting
Section titled “Troubleshooting”- If verification fails, double-check your DNS settings
- Confirm the TXT ownership record exists — verification cannot complete without it, even if the domain appears to work
- Ensure you’ve removed any conflicting records (but never the TXT ownership record)
- DNS propagation can take up to 24–48 hours, though it’s usually much faster
Using Your Custom Domain
Section titled “Using Your Custom Domain”Once active, your secret links will use your custom domain. For example:
https://secrets-example.onetime.dev/secret/abc123
We’ve Got You Covered
Section titled “We’ve Got You Covered”We handle the rest of the technical details so you don’t have to.
- We continuously monitor your domain’s status
- SSL certificates are automatically renewed without any action required on your part
For those who like to stay informed, you can easily check the health of your domain:
- Simply look at the “Last Monitored” timestamp in your dashboard to confirm ongoing connectivity
Questions or Need Support?
Section titled “Questions or Need Support?”We’re here to help. If you have any questions or need assistance:
- Email us directly at support@onetimesecret.com
- Use our feedback form at https://onetimesecret.com/feedback
Our team is committed to providing you with the best possible support for your custom domain setup and usage, including guidance on choosing the right data center region for your needs.